Scissors are a household staple, helping with everything from home improvement projects to hair cuts to meal prep. If your scissors are used frequently, they’ll start to show signs of wear as the blades dull. You can restore your scissor blades by learning how to sharpen scissors at home using a whetstone or several other straightforward sharpening techniques. Read on to discover the best way to sharpen scissors at home and when it’s a good idea to send your scissors to the experts for professional sharpening services.
Why Scissors Get Dull (and When Sharpening Works)
How Scissor Blades Actually Cut
Scissor blades cut by applying a powerful shearing force, where the two sharp edges slide firmly past each other, pushing the material in opposite directions until its molecular bonds break, effectively shearing or tearing it apart at the point of contact. This is accomplished by having two sharp blades that are slightly curved, ensuring that they only touch at the cutting edge when they close. The motion creates intense pressure, while reducing friction for a clean cut.
Signs Your Scissors Are Dull vs Damaged
It’s important to recognize the difference between dull and damaged scissors. Dullness refers to the quality of the cutting edge. If it’s worn down, the blades can be sharpened to restore the edge. Damage is more about physical flaws in the blade or the mechanism of the scissors, such as nicks, bends, or misalignment.
Dull scissors pull, push, fold hair, fray edges, or feel sluggish, causing uneven cuts, split ends, and hand fatigue, while damaged scissors often have visible nicks, make grinding noises, or snag hair due to physical imperfections. Dull blades typically require sharpening to restore a clean, smooth cut, but damaged blades need to be repaired or replaced to prevent further problems.
When Sharpening Won’t Fix the Problem
Sharpening cannot fix every issue. In some cases, you may need to take steps to repair the scissors or even replace them if the problem cannot be resolved.
- Tension Issues: A loose pivot screw allows blades to spread apart while a screw that is too tight makes them stiff and hard to use, both preventing clean cuts.
- Blade Misalignment: If the blades don’t meet perfectly or have a slight curve, they won’t shear cleanly, often folding the material you’re trying to cut.
- Damaged Ride Line: The inner surface or ride line can become pitted or dull from use. If the scissors are sharpened incorrectly, which can happen when both sides of the blade are sharpened like a knife, it ruins the scissor action.
- Excessive Wear: Too much material removed during sharpening can make the edge too thin and weak, or the blades too far apart. In this instance, it is often better to replace the scissors.
What Kind of Scissors Can Be Sharpened at Home
Household and Kitchen Scissors
You can sharpen most household and kitchen scissors at home using simple methods like cutting sandpaper, using a whetstone, or using a dedicated handheld sharpener. This tends to work well on standard straight-edge blades for tasks from opening mail to food prep. Scissor types with easily detachable blades (like many kitchen shears) are easier to maintain, but even permanently affixed blades can often be touched up, though you need to maintain the correct angle to avoid damaging the scissors.
Sewing and Fabric Scissors
You can sharpen most sewing and fabric scissors at home using tools like whetstones, fine-grit sandpaper, or dedicated scissors sharpeners, but professional sharpening is best for high-end shears due to fabric being more difficult to cut than other common materials, like paper. The key is maintaining the correct angle when sharpening the blades and applying the right amount of pressure to sharpen the blade while avoiding removing too much metal.
Related: How to Sharpen Kitchen Knives at Home for Safe, Efficient Cutting
What Not to Sharpen
You should not sharpen scissors with a convex edge, like high-end hair and grooming shears, since these scissors require specialized jigs and expertise to maintain the blade’s unique shape. Additionally, scissors with serrated edges should not be sharpened at home. The teeth on these blades are delicate. While some professional sharpeners can handle them, DIY methods (like cutting foil) are often ineffective and can damage the serrations.
Similarly, specialized shears (like for Kevlar) will typically require specific equipment to sharpen correctly. Lastly, you can sharpen very cheap or disposable scissors, but it isn’t usually worth the time and effort when you can just buy a new pair.
Tools You Can Use to Sharpen Scissors at Home
Whetstone or Sharpening Stone
Sharpening scissors with a stone is one of the best ways to keep the blades sharp, though it will take practice for beginners to get the feel of moving the blades across the stone at the correct angle. “Whetstones (water stones or oil stones) are considered the gold standard for creating a refined and sharp edge. They offer the most control and the best results,” says Bill Joseph, founder of Frontier Blades.
Dedicated Scissors Sharpeners
If you aren’t comfortable using a whetstone to sharpen your scissors, you can rely on dedicated scissors sharpeners that are specifically made for sharpening scissors. These tools typically have a V-shaped design that is intended to match the angle of the blade, allowing you to simply slide the blade through the V-shaped slot for efficient and precise sharpening.
Household Methods
Alternatively, there are several household methods you can try if you do not have a dedicated scissors sharpener or a whetstone available, including sandpaper, coins, or even a glass jar.
- Sandpaper: Cut through folded sandpaper to smooth and sharpen the edges of the blades.
- Coin: Cut into a coin (like a dime or quarter) at an angle, sliding the coin between the blades to sharpen.
- Glass Jar: Cut into the rim of a glass jar to hone the blades. Just be careful not to apply too much pressure, as you may break the glass.
Related: Stop Using Dull Knives Now: The Beginner Whetstone Guide Chefs Swear By
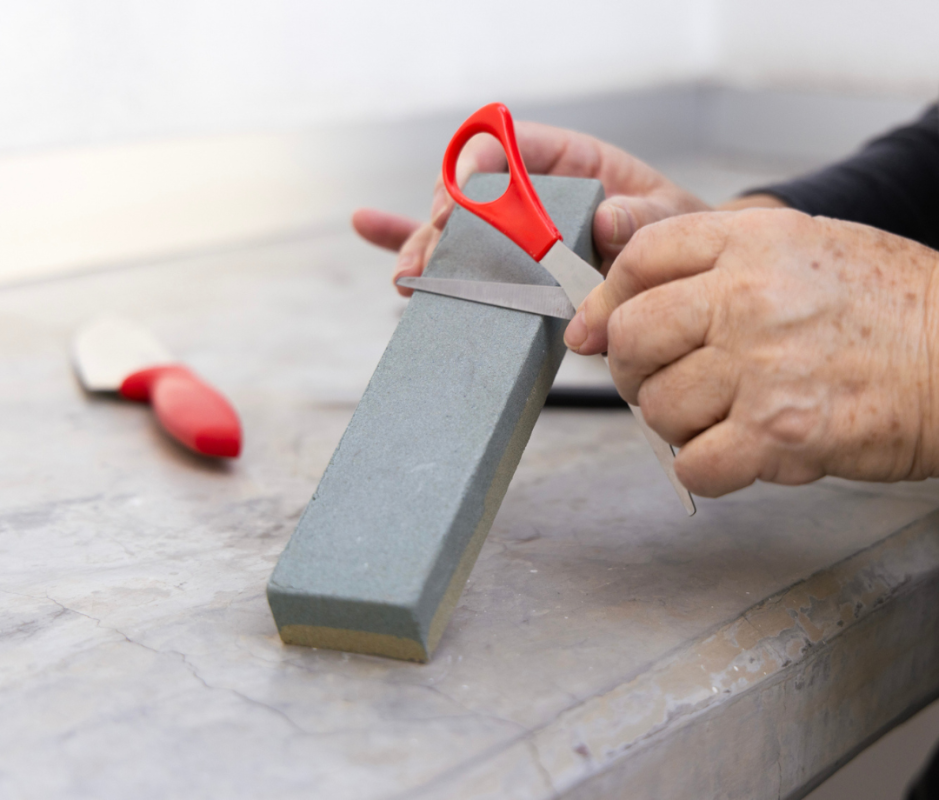
How to Sharpen Scissors With a Whetstone
Step 1: Take the Scissors Apart (If Possible)
It’s relatively easy to learn how to take scissors apart, at least for most pairs. Simply remove the screw or bolt at the pivot point, then separate the blades so that you can sharpen them individually. However, some scissors use a rivet rather than a screw or bolt at the pivot point, in which case you will be unable to take them apart to sharpen the blades.
Step 2: Identify the Factory Bevel
You will then need to find the angled, beveled edge on the inside of the blade. This is the edge that touches the other blade when the scissors are closed. To determine the factory bevel, you can use a marker test. Start by coloring the entire cutting edge with a red marker, then take one light pass with the whetstone, just enough to remove some marker. If the entire edge is clean, then the angle is correct, but if some or all of the marker remains you will need to adjust the angle.
Step 3: Sharpen the Blade Correctly
Place the whetstone on a stable surface and hold the blade at the original bevel angle. “Push the blade across the stone, maintaining consistent and light-moderate pressure, as though you were trying to slice a thin layer off of the top,” instructs Joseph. Make between 10 to 15 strokes, then check to see if a burr has been formed.
Step 4: Remove Burrs and Repeat On the Other Blade
A burr, which is a tiny lip of metal, is a prime indicator that you are sharpening the blade correctly. Joseph notes that you should “continue grinding and repeat the strokes on one blade until you feel the burr raised from the heel to the tip of the blade. Do not switch until you feel the burr on that blade.” Once the burr has been raised, switch to the other blade. To remove the burr, switch to a finer grit whetstone for a polished edge, alternating blades as you go.
Step 5: Reassemble and Adjust Tension
Finally, reassemble the scissors so that the blades meet evenly from the heel to the tip. Check the tension by opening the scissors and allowing the top blade to close naturally. Ideally, it should stop at about 45 degrees. If the blade closes more than this or stops before the 45-degree point, adjust the tension screw to get the right amount of tension for efficient cutting.
Related: 5 Best Knife Sharpeners of 2025 for Beginners and Pros, Recommended by Experts
How to Sharpen Scissors Without a Stone
Using a Manual Scissor Sharpener
Sharpening scissors without a stone doesn’t need to be difficult if you have a manual scissor sharpener. To sharpen scissors with a manual sharpener, you typically open the scissors and insert one blade into the sharpener’s slot marked for scissors, then pull the open blade through the sharpener, mimicking a cutting motion from pivot to tip. Repeat this process a few times (3-10 passes) until sharp, focusing on the beveled edge to create a slight burr, then repeat on the other blade, before finally cleaning the blades and sharpener.
Sandpaper Method
It is possible to sharpen scissors without a sharpener using the sandpaper method. To sharpen scissors with sandpaper, fold a piece of medium-grit (150-200 grit) sandpaper so the abrasive side is out, then cut through the folded paper repeatedly from pivot to tip, ensuring full blade contact to hone the edges. When you feel like the blades are sharp, wipe the blades clean to remove metal dust. This method sharpens both blades simultaneously by removing small amounts of metal, bringing dull blades back to life.
Why Aluminum Foil Rarely Works (And When it Might)
There is a prevalent myth that cutting through aluminum foil can sharpen the blades of your scissors. However, aluminum foil rarely truly sharpens scissors because it’s too soft to grind hard steel. Instead, it only cleans and de-burrs, removing gunk and microscopic burrs, which can feel like sharpening, but it may actually dull blades over time by rounding the edge. It might seem to work for minor issues on everyday scissors, but for real sharpness, you need abrasives like sandpaper or a whetstone. Though, foil can be used as a temporary fix for honing and polishing.
Related: How to Remove Rust From Cast Iron and Re-Season Your Skillets and Pans
Common Scissor Sharpening Mistakes
Sharpening Both Sides of the Blade
Most scissors have a hollow grind or inward curve on the flat side (the ride line). Sharpening this surface creates a flat spot or even a double angle, ruining the shearing action and making the blades press together incorrectly, causing them to fold material instead of cutting it cleanly. Only sharpen the outside bevel (the angled cutting edge) and potentially polish the inside flat surface lightly without creating a new angle or removing the hollow.
Additionally, Joseph notes that a common “mistake beginners make is switching blades too early before raising a burr. If a burr is not raised on each blade, the scissors are not being sharpened. You must sharpen long enough on one blade to raise a burr first before switching to the other blade.”
Changing the Bevel Angle
Changing the angle from the factory setting by tilting the blade too much or too little creates a round or flat spot. This often occurs when you shift your wrist or body during strokes, leading to an uneven angle along the blade. Lock your wrist and use your whole arm or body to move the blade consistently across the stone, maintaining the same angle throughout.
Skipping Blade Alignment and Tension
Skipping blade alignment and tension during scissor sharpening creates dull, ineffective, and damaging tools. This neglect can lead to material folding due to loose tension, rough or jagged cutting due to overly tight tension, hand fatigue, and tips not cutting, even if the edges are sharp. To fix this problem, adjust the tension so that the blades naturally stop at about 45 degrees, not fully closed or fully open. Next, ensure the blades meet evenly heel-to-tip for efficient cutting. In some cases, you may need to seek professional help for true alignment fixes beyond simple tension screws.
Over-Sharpening Thin Blades
Over-sharpening thin blades, especially hair shears, ruins their alignment and hollow grind, creating a “wavy” edge that tears material instead of slicing it cleanly. This is often due to removing too much metal from the inner faces, making the blades touch unevenly, and leading to a rough cut and poor performance, even if they feel sharp on paper. You may need to start thinking about when to replace your scissors, depending on how over-sharpened the blades are and whether they can be repaired or not.
How to Test If Scissors Are Sharp
Paper Test
Testing the sharpness of your scissors is essential for identifying when your scissors need to be sharpened. “The paper test involves holding a sheet of paper vertically, and using the scissors to slice through it. If the scissors are sharp enough, they should slice through the paper cleanly without snagging or tearing it,” says Joseph. Ideally, the scissors will glide through the paper effortlessly, but if they snag, fold the paper, or leave a jagged edge, then this is a sign that you need to sharpen the scissors.
Fabric and Plastic Tests
If you have sewing or craft scissors, then using the fabric test is a good way to determine if your scissors need to be sharpened. Start with a single layer of light fabric like cotton, silk, or even a paper towel. Open the scissors wide and make one long, decisive cut from the screw (pivot) all the way to the tips, applying steady, even pressure. Sharp scissors will produce a clean, continuous cut without pushing the fabric, bunching, or leaving ragged edges. If it snags or requires more force, the blades are dull.
Similarly, you can perform a plastic test to check the sharpness of the scissors. Cut through a piece of thin plastic (like a plastic bag or a plastic sheet). A clean cut with no tearing or grabbing indicates proper tension and sharpness.
Visual Edge Inspection
To visually inspect scissor sharpness, look for a smooth, uniform, and shiny edge without nicks or burrs. Hold the blades up to light. A sharp edge looks perfectly straight and smooth, while dullness might appear as tiny dull spots or imperfections. Additionally, you should look for any nicks, chips, or discoloration on the blades.
Next, gently run your thumb along the edge (away from the cutting direction). A sharp blade will feel uniformly smooth and “bite” slightly, while a dull one feels smooth but doesn’t catch, or worse, feels jagged/uneven. Just be careful not to cut yourself. You should also check the tension of the blade by letting the top blade fall. It should fall slowly or stay put; if it snaps shut quickly, tension might be too loose, causing poor cutting.
Related: How to Clean Stainless Steel Appliances for a Shiny, Streak-Free Finish
How to Maintain Sharp Scissors
Cleaning Sticky Residue
If your scissors get sticky residue on them, then it’s important to clean the blades to keep the scissors in good condition. This can typically be done by using isopropyl alcohol, hand sanitizer, white vinegar, or citrus-based removers. Simply apply the cleaning solution to the blades, use a cloth or paper towel to wipe them clean, then repeat as necessary until the blades of the scissors are completely free of sticky residue. Make sure to dry the blades thoroughly after cleaning to avoid rust.
Proper Use and Storage
Proper scissor usage typically involves neutral wrist positions and a light grip, as well as only using them for their intended purpose. Clean and oil them regularly (especially the pivot) and store them dry in a protective sheath or case away from humidity and other tools to avoid dulling or damaging the blades. Additionally, you should avoid using the scissors on harsh materials, like wire, and you should regularly sharpen the blades.
How Often Scissors Need Sharpening
Your scissors can dull over time, depending on how frequently they’re used, what items you cut with the scissors, and your level of care and maintenance. “How often you should sharpen your scissors depends on frequency of use and how often you maintain your blades. If you are honing your scissors regularly, you won’t need to sharpen them as often. Sharpening is only required when honing no longer restores the edge,” explains Joseph.
On average, you should sharpen scissors at home about once every few months to once a year, though the exact timeline depends on the above mentioned factors, as well as the quality of the scissors. For this reason, it’s recommended to learn how to sharpen dull scissors yourself and how to identify when your scissors are dull.
Related: How To Use a Honing Steel To Keep Your Knives Razor-Sharp
Scissor Sharpening FAQs
Can You Sharpen Scissors With a Knife Sharpener?
You can sharpen scissors with a knife sharpener, but you need to be careful to only sharpen the beveled edge, not the flat back. Additionally, you need to maintain the original angle to avoid ruining the scissors. So, while it is possible, it does come with some risks to your scissors if you are not careful.
Why Do Scissors Cut Paper But Not Fabric?
Typically, scissors that are made for cutting paper have a different blade angle and may be more dull than fabric scissors, which are made to be extremely sharp and durable for textiles. Also, paper tends to have minerals like calcium carbonate and clay that increase the stiffness of the material, making it easier to cut with scissors.
Is Professional Sharpening Worth It?
Whether professional sharpening is worth it or not depends on how you intend to use the scissors and your frequency of use. If you only use them infrequently for crafts around the house or cooking, then professional sharpening may not be worth the time and money spent. However, if you use them regularly and value high-quality blades, then professional sharpening is the best way to ensure your scissors are sharp, accurate, and highly efficient.
How Long Do Sharpened Scissors Last?
Sharpened scissors can last anywhere from a few months to over a year before needing to be sharpened again. The exact timespan depends on the frequency of use, material quality, maintenance care, and what materials you’re cutting with the scissors. Expect to sharpen scissors more often if you use them frequently with hard materials and less often if they are mostly used to cut softer materials.