There’s something enticing about gathering around a backyard fire pit at dusk with a group of friends and family, enjoying stories over some of the best beers. If you’ve ever dreamt of building one—whether wood-burning or propane-powered—you’ll be happy to know that it’s not as hard as you might think to do it yourself.
There are pros and cons to each kind of backyard fire pit. “I like wood burning for its rustic appearance and ability to cook hotdogs and s’mores easily,” says Sara Bendrick, landscape designer and contractor at Sarita Landscape Inc. “Propane or gas fire pits are cleaner and easier to use but require more set up time and expertise, including a licensed plumber to run and connect the gas.”
In addition to the choice of fire source, custom fire pits can take a variety of shapes and use a range of materials. Still, there is the old DIY standby that’s round, wood-burning, and made from masonry. Bendrick says: “Wood firepits are by far the easiest as you just need masonry—blocks, bricks, boulders, etc.—set up in a rectangle or circular shape.”
Keep reading to find out how to build a fire pit in your backyard and get inspired by 10 creative backyard fire pit ideas.
Steps to Building a DIY Backyard Fire Pit
Building a fire pit isn’t complicated, but it does require attention to detail and some strength to handle the masonry and dig out the fire pit area. While you can do this project alone, it’s easier and more pleasant to ask a handy friend to help. (And don’t forget to return the favor when your friend wants to build a fire pit in their backyard.)
Sara Bendrick, owner of Sarita Landscapes, Inc
Step 1. Gather supplies and tools.
It’s efficient and less stressful to acquire all of the materials and tools you’ll need before you begin. By having everything gathered at the project site, you’ll save an enormous amount of time that can be wasted walking back-and-forth during the project and having to stop to drive to the home improvement center to pick up forgotten supplies—or a tool that you swore you had in your garage.
When choosing masonry for a fire pit, trapezoidal blocks make it easier to achieve a round shape. Still, keep in mind that not all masonry is appropriate for a fire pit. Look for either fire-rated blocks or line the inside of stone with fire bricks or a metal ring. Also, make sure to carefully choose seemingly noncombustible materials like pavers, because water that’s inside a crack may actually cause the masonry to explode when heated.
Here is the list of tools and supplies you’ll need to complete a simple backyard fire pit:
Tools and Supplies
Marking spray paint
Mason’s string
Stakes
Digging shovel with a sharp blade
Tamper
Level
Gravel
Sand (optional)
Wheelbarrow (optional)
Trapezoidal blocks
Fire bricks (or metal insert)
Outdoor oven cement
Step 2. Decide on the fire pit placement in your backyard.
Many municipalities have local fire codes for open fires and may require a minimum distance of 10 to 15 feet from fences, trees, and structures, which includes your neighbors’ homes. However, the required distance varies depending on the municipality and homeowners association (HOA), so make sure to check regulations before you start this project.
Also be mindful of typical wind direction when selecting the location, so you can minimize the annoying smoke-in-the-face.
Related: Want to Master the Art of Landscaping? We Rated the Best Lawn and Garden Tools of 2025
Step 3. Create a rough layout of the fire pit.
After you decide on the placement of the fire pit, decide on the size and shape. While you can create any shape, something round is easy and traditional, so that’s what we’re using in this how-to guide. Many typical fire pits are about three to four feet wide.
For a round fire pit, use a string and wooden stake to lay out the general size. Place the stake in the center, tie a mason’s string to it and then rotate the string around the stake and place stakes every foot around the circle. These stakes will provide a general guideline when laying out the actual stones.
Step 4. Place one layer of trapezoidal blocks in the desired shape.
Using the stakes as a guideline, begin dry fitting the trap blocks around the circle until you achieve the exact size and shape you’d like. Keep in mind that the blocks won’t fit the stakes perfectly, they are just there as a guideline. Don’t force the general layout so you need to cut stones to fit. Make it easy and less complicated by using full blocks.
Step 5. Mark the location of the fire pit shape.
Using marking spray paint (or stakes and string), outline the shape of the stones on the ground. Try to avoid painting the blocks, but don’t worry about getting a little spray paint on the lower portion of them as those blocks will be set beneath the ground level. If you do make an accidental spray paint mess, you can just turn the blocks inward and the painted face can be covered by the fire bricks.
Related: Why Your Grass Is Dying—and Exactly How to Fix It
Step 6. Remove the dirt within the marked shape.
It’s time to shovel. Remove the sod and then about six to nine inches of dirt within the marked fire pit ring. If you’d desire a more sunken fire pit look, remove more. Tamp down the remaining soil within the ring and use a level to check that the fire pit hole is level.
Step 7. Pour pea gravel (and then sand) into the hole.
Cover the bottom of the fire pit with pea gravel. You can also pour sand on top of the gravel until it’s about three inches from the top of the opening. While it’s not essential to add sand on top, it does help decrease maintenance later by making it easier to remove ash after each burn.
If you choose to pour sand on top, keep in mind that you will likely need to replace the sand as it will settle through the gravel and get removed when cleaning out the ash after a fire.
Step 8. Lay the ground level of blocks.
Make sure the inside of the pit is tamped down and level. Then set the first layer of trap blocks inside the perimeter of the fire pit hole. Check that the wall is level every two to three stones. Use leveling sand to help raise any blocks that are lying below level.
Step 9. Continue stacking blocks.
Stack the next course of blocks in an overlapping pattern. For example each trap block should bridge the gap between the blocks underneath. This creates a more stable structure.
Related: Don’t Skip This Late-Summer Fertilizer Step or Your Lawn Will Suffer This Fall
Step 10. Add a fire brick interior lining.
After all of the blocks are laid, it’s time to line the interior of the trap blocks with fire bricks. First, dry fit the fire bricks to check the spacing. Insert them vertically around the inside of the pit.
While you want them to be fairly snug, allowing some very narrow ventilation in a few spots can help feed the fire with oxygen as it burns. When you are satisfied with the arrangement, use outdoor oven cement to adhere the fire bricks to the trap blocks.
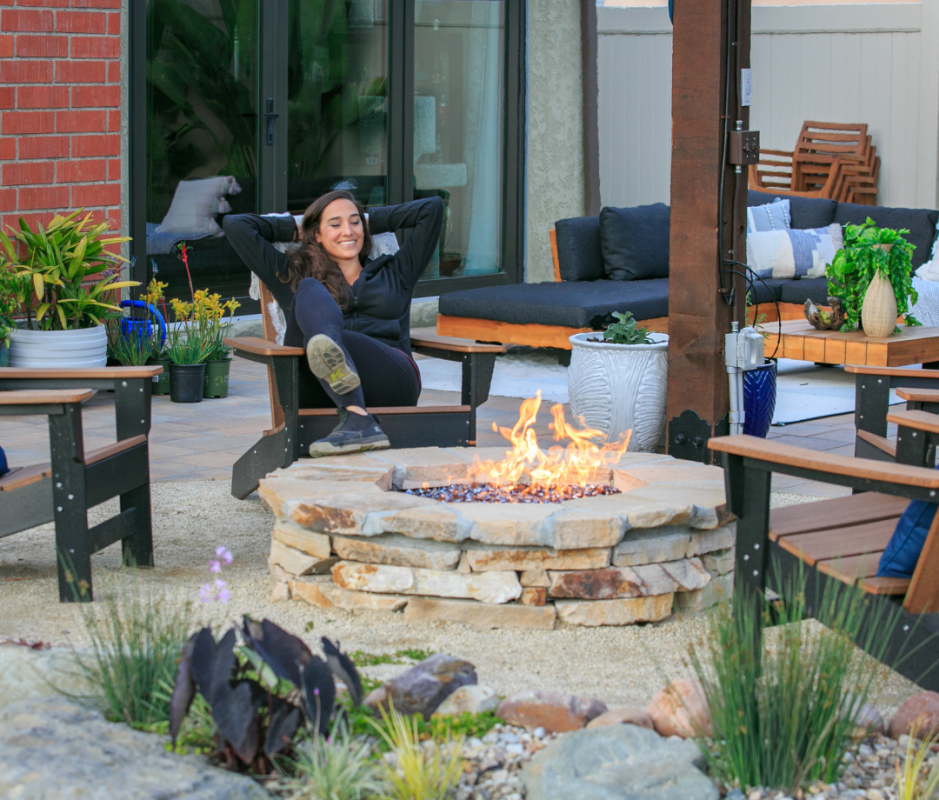
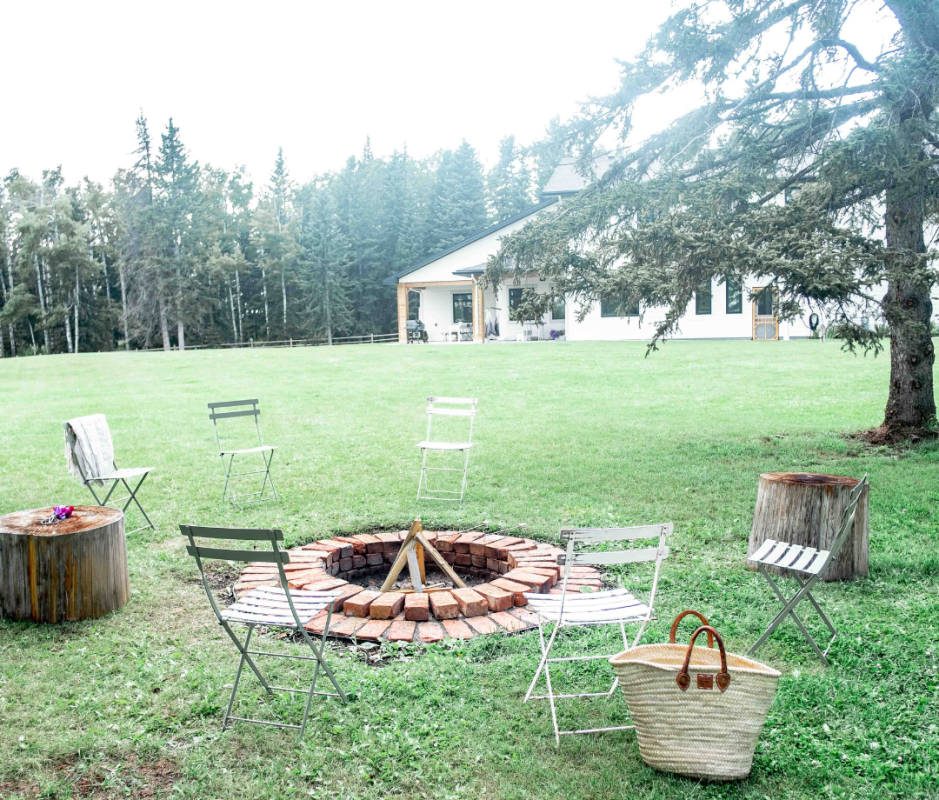
Step 11. Add seating around the fire pit.
After the fire pit is constructed, it’s time to enjoy it. Add some seating and other creature comforts around the fire pit. Depending on the fire pit size and the material of the chairs, many experts say that seating can be placed within three to seven feet away from the fire pit. You may want to add spark screens or cooking grates.
Step 12. Maintain your new backyard fire pit.
A fire pit needs to be maintained. After each wood-burning session has cooled, scoop out any ash, unburned wood, and other debris from the fire pit. Put ashes in an ash bucket. A weatherproof cover can reduce the effort of keeping the interior of the fire pit tidy and free of organic matter.
When the blocks start to show wear and age, you can clean them with a solution of one part muriatic acid and 10 parts water. Wear gloves, and cover all skin when scrubbing with this solution. Spray the blocks with water and wait a few days before using the fire pit.
Backyard Fire Pit Landscaping Ideas
If you are inspired to create an original layout or an unusual fire pit design in your backyard, get inspired by the following 10 backyard fire pit ideas that include traditional masonry fire pits, an upcycled washing machine fire pit, and a sunken conversation fire pit.
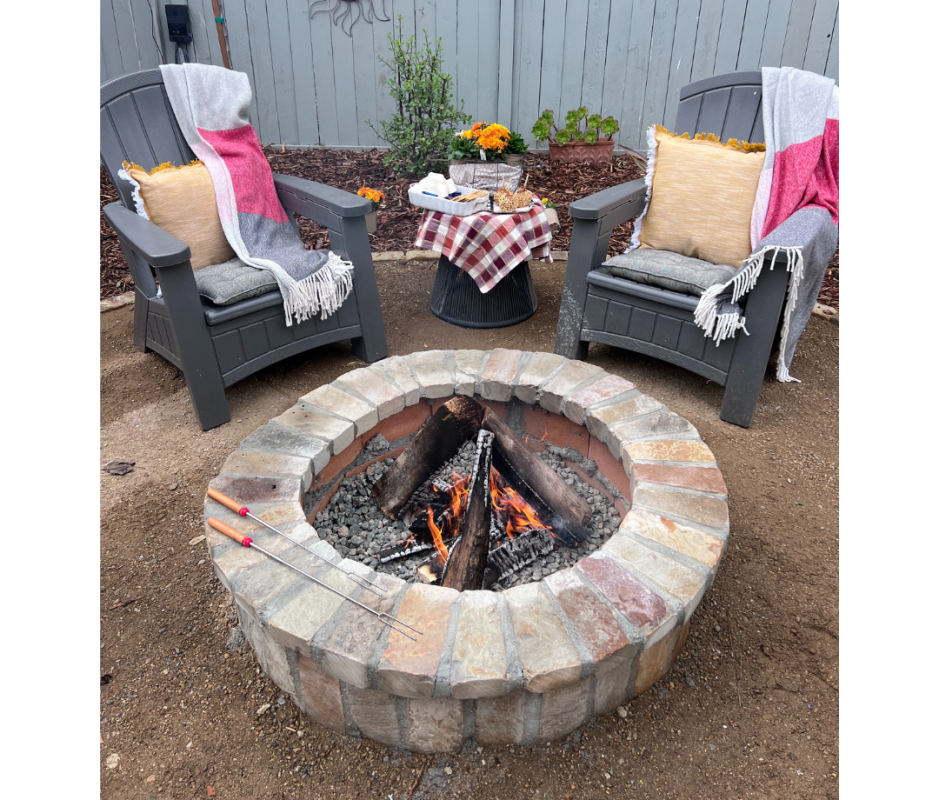
Natural Stone Block Fire Pit
Sara Bendrick, owner of Sarita Landscapes, Inc.
Sara Bendrick designed this stacked natural stone fire pit with trapezoidal blocks on a dirt surface. “A stacked blocked wood fire pit kit or DIY-style nursery block fire pit is the easiest type of fire pit to assemble. You also can stack bricks or boulders as well.”
How easy is it? She says: “It can be done in one to three hours depending on the prep of the ground.”
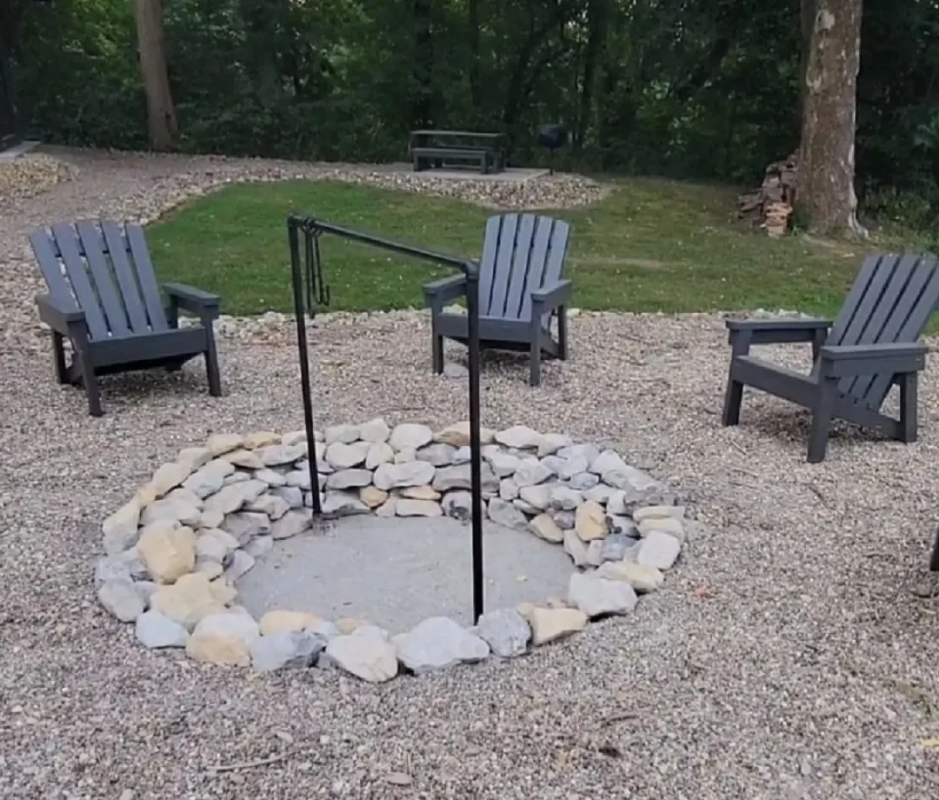
Sunken Stacked Fire Pit with Cooking Bar
Jim and Mary Competti from Old World Garden
Jim and Mary Competti from Old World Garden created this 60-inch-wide sunken fire pit in their courtyard. In this design, they chose inexpensive organic-shaped limestone “D” rocks to line the ring of the fire pit and stacked them in a bowl design.
The Compettis say: “What really makes it even more usable is the addition of a removable homemade cooking bar. It basically turns the pit into an outdoor kitchen—whether for making huge pots of vegetable or chili soup, or for smoking all kinds of meat.”
Stacked Stone Fire Pit
Sara Bendrick, owner of Sarita Landscapes, Inc.
For a more polished stone fire pit look, consider stacked stone like this one. “I like using stacked stone with firebrick on the inside,” says Bendrick. Fill the inside with pea gravel to elevate the fire to eye-level.
Brick Fire Pit
B Vintage Style
It’s not essential to use trapezoidal-shaped blocks to create a fire pit. Deborah Lynn from B Vintage Style used rectangular bricks to build this sunken fire pit.
“The secret isn’t in stacking bricks—it’s in the base. Take the time to level and pack gravel or sand, and your fire pit will last for years,” says Lynn.
Fire Pit Bowl
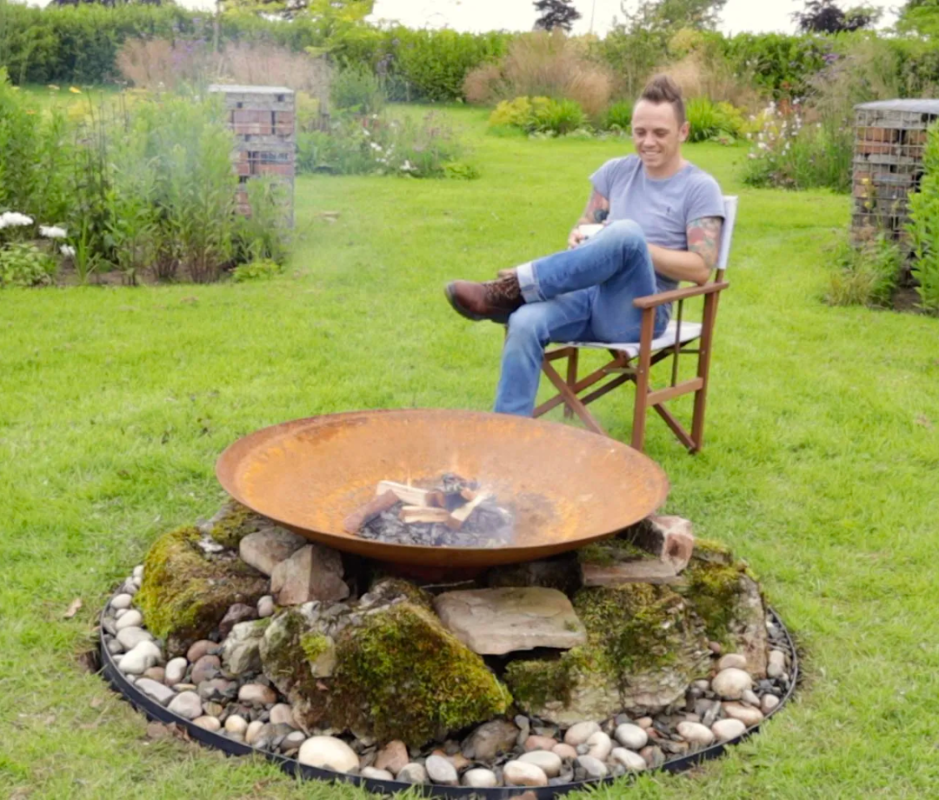
Lee Burkhill
Using a steel bowl like this design by Lee Burkhill, the Garden Ninja, is another dramatic way to create a modern backyard fire pit. Unlike the size flexibility of using stone, the bowl determines the size. However, the steps required to prep the ground for this type of fire pit bowl are the same.
Burkhill suggests using gravel to decorate and dress any gaps between the base stones and the bowl. “This decorative step will start to make your fire pit look amazing. So take your time and use any recycled materials you can as long as they are heat resistant. Broken roof tiles or broken terracotta pots can look great too!”
Washer Drum Fire Pit
A washer or dryer drum can also be used to create a fire pit. This backyard fire pit used to be the inside of a top-load washer that Sarah Collins from Self Sufficient Sarah used to make her fire pit. With help from a handy neighbor who welds, they added legs and handles to make it easier to move.
Custom Concrete Fire Pit
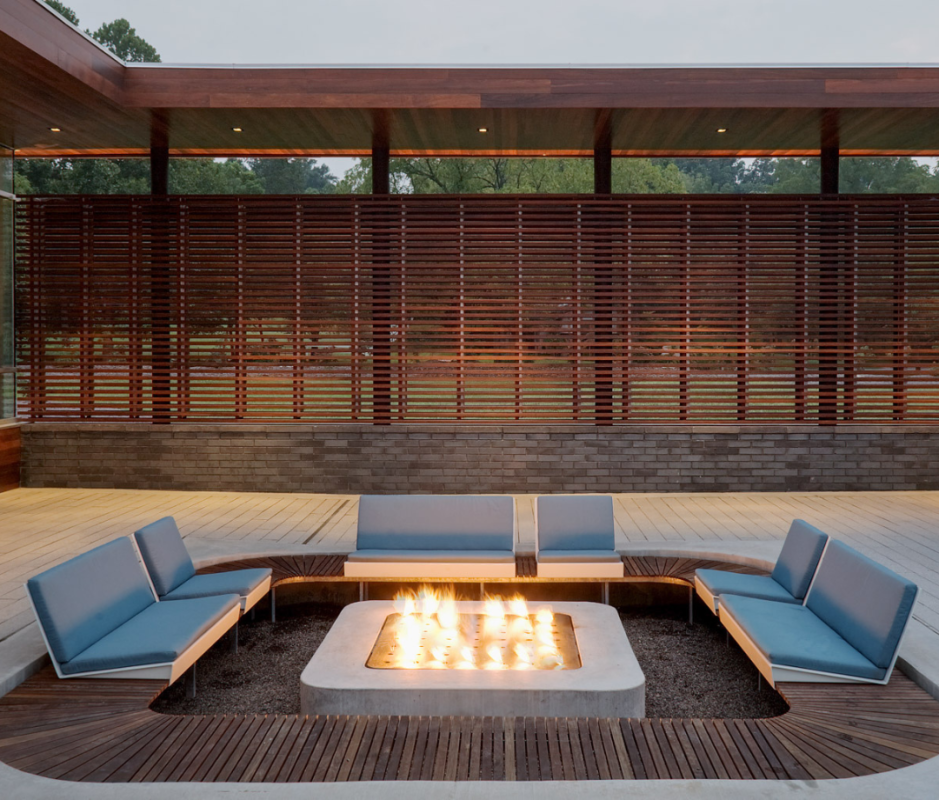
Mike Sinclair
Created in collaboration with 40 North Landscaping, the residential design firm Hufft created this sunken area with curved, wood, built-in seats to create a modern take on a traditional conversation pit. Gravel fills the area between the pit and the seating.
“The recessed design allows people to sit low, close to the flames, shielded from wind, and wrapped in the architecture. It creates an outdoor room that feels both expansive and cozy,” says Matthew Hufft, AIA, WELL AP, and Founder & Partner at Hufft.
Fire Pit with Screen
GGF Landscape Group
Fire pits are notorious for blowing smoke and sparks, but adding an adjustable screen like this one from GGF Landscape Group can help reduce it and make the experience more comfortable for everyone gathering around the fire.
Another method to battle wind is to create a movable unit. “Sometimes homeowners will actually do better with a premade mobile unit so that they can move it on or off their patio rather than it being completely stationary,” says Frank Maletta, owner of GGF Landscape Group.
Fire Pit Art
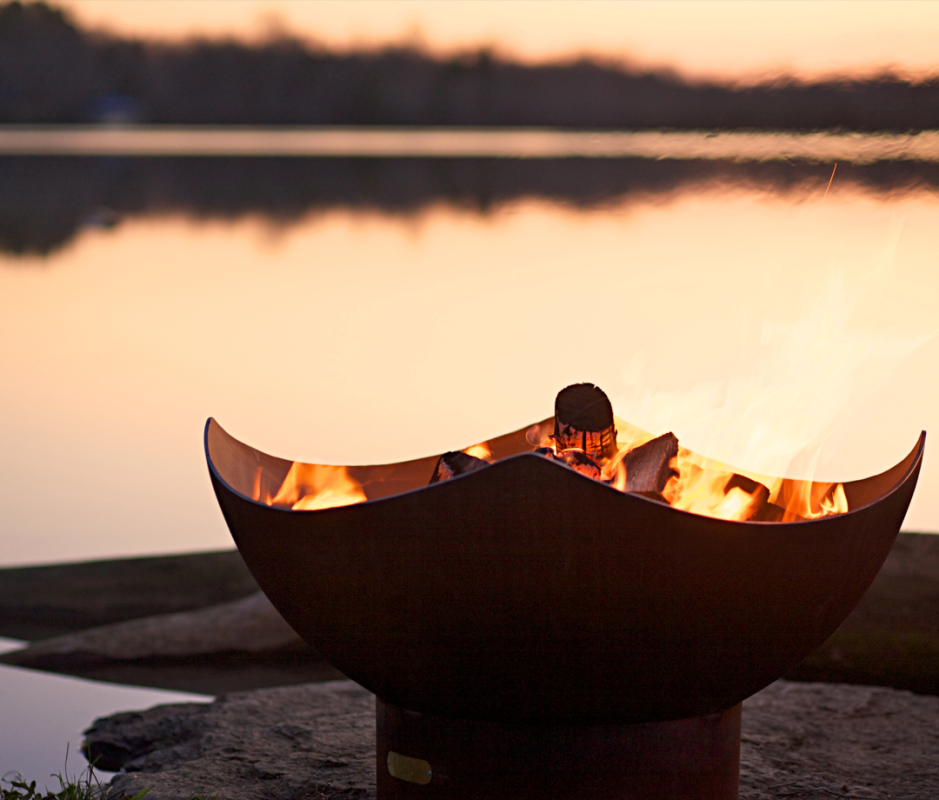
Fire Pit Art
Working with metal to create a fire pit is an advanced skill, and many DIYers will leave this feat of construction expertise to the experts. Crafted from mild carbon steel, the sculptural shape of Fire Pit Art‘s Manta Ray fire pit creates a modern and whimsical aesthetic.
Boulder Fire Pit
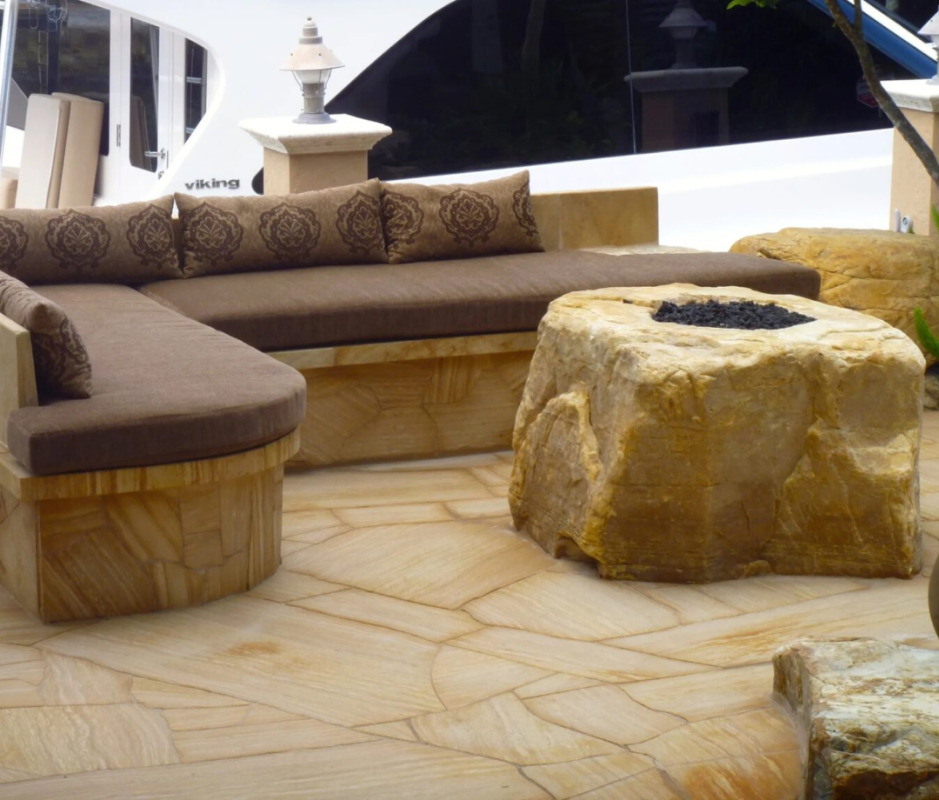
Matthew Giampietro
What seems to be straight out of the Flinstones’ backyard, this boulder fire pit from landscape designer Matthew Giampietro is a dramatic monolithic moment that gives both an ancient and modern vibe simultaneously.