Home maintenance tasks, like replacing your HVAC filter or fixing that loose light switch, are easy to put off. For example, most people don’t pay much attention to their hot water heater until it stops working and their steamy shower turns ice cold. At that point, it’s often too late to save it, leading to a costly replacement. Giving your hot water heater a little TLC once or twice a year can make a big difference in how long it lasts. A water heater you don’t maintain might last just six to eight years, while a well-maintained water heater can give you up to 12 years of service. Given that maintaining your water heater is something you can do on your own with basic tools and supplies, devoting an afternoon each year to hot water heater maintenance is a no brainer. Ahead we break down how to maintain your hot water heater.
Tools for Maintaining Your Water Heater
- Garden hose
- Screwdriver
- Adjustable wrench
- Pipe wrench
- Teflon tape
- Replacement anode rod (if needed)
How to Maintain a Water Heater
Periodically changing out the anode rod, flushing the tank, and testing the pressure relief valve are all easy maintenance tasks you can perform to keep your water heater in top condition. Follow these steps to complete those tasks.
Cut the Power and Water
Start by cutting the power to your hot water heater. If you have an electric water heater, you’ll find the circuit to shut it off in your electrical box. For gas hot water heaters, turn the thermostat dial to off then shut off the gas by turning the valve on the gas supply line to a 90 degree angle. Next, turn off the cold water supply by turning the valve to the right until it’s shut.
Check the Hot Water Heater Anode Rod
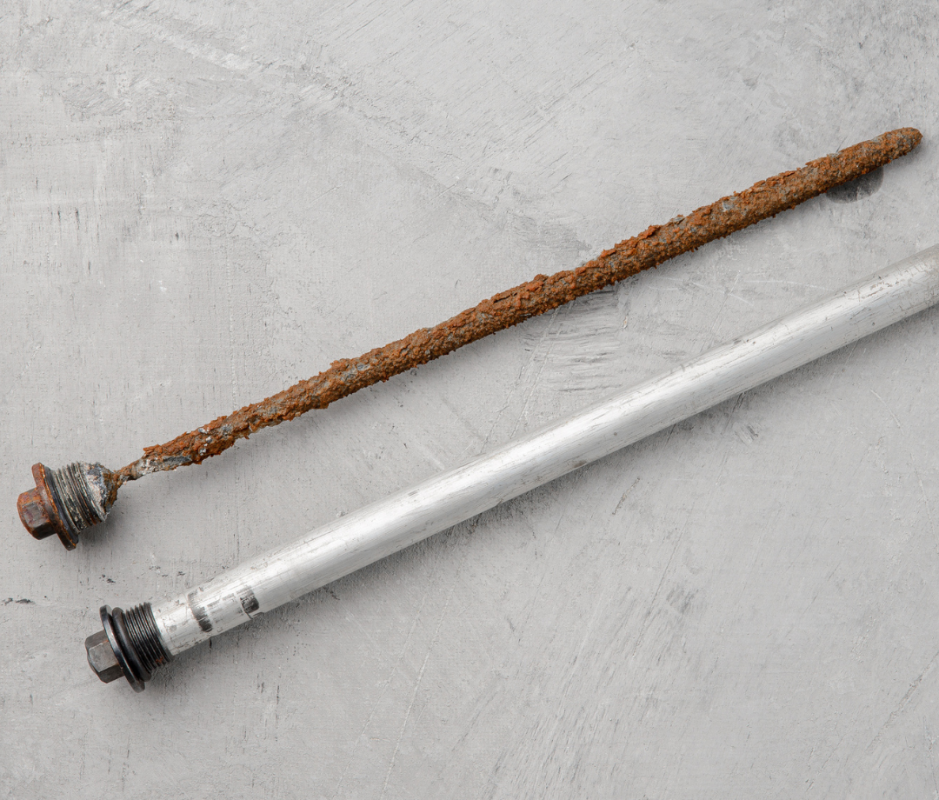
The purpose of a hot water heater’s anode rod is to prevent the inside of the hot water heater’s tank from corroding. This metal rod attracts corrosive elements, so it rusts and corrodes rather than the tank itself. Most anode rods last three to five years, after which you need to replace them. When the rod wears out, it loses its ability to attract those elements, making the tank vulnerable to rust. “Some signs of a bad anode rod are rotting egg smell when the water is running, rusty or discolored water, and sediment or corrosion flakes appearing in the water,” says Shaylin King, owner of Mr. Rooter Plumbing of Tri-Cities, Yakima, and Hermiston in Washington. Ahead, we take you through how to inspect and replace an anode rod:
- Drain a few gallons of water out of the hot water heater via the drain at the bottom of the tank, then locate the anode rod, which is usually on the top of the water heater.
- Unscrew the anode rod hex nut using an adjustable wrench, then pull the anode rod out of the hot water heater.
- Examine the anode rod. If it looks pitted, corroded, or worn down, it’s time to replace it with a new one.
- Apply plumber’s tape around the threads of the new anode rod, then hand screw it into the water heater before tightening it in place using an adjustable wrench.
Getty Images
Flush the Hot Water Heater
Over time, sediment in hard water will build up in the bottom of your hot water tank, making it more and more difficult for the water heater’s element or burner to warm the water. Periodically flushing out the hot water heater removes this sediment. How often you need to do it depends on your home’s water usage. “For homes that have heavy water usage, flush the tank every six months,” King says. “For homes with average water use, flush the tank once a year.”
- Connect a standard garden hose to the drain at the bottom of the hot water heater and run the other end of the hose outside.
- Open the valve on the hot water heater and allow it to empty, which should take around 20 minutes. Check the water coming out the hose to see how much sediment is coming out. This will give you an idea of how often you need to flush the tank.
- After the tank drains, briefly turn the cold water input back on to further flush out any sediment remaining in the hot water heater.
- Close the drain valve at the tank, remove the hose, and turn the cold water valve back on.
- Allow the hot water heater to fill before turning it back on. For an electric hot water heater, simply switch the breaker back on. You’ll need to relight the pilot light for a gas hot water heater.
Check the Pressure Relief Valve
The pressure relief valve is a safety device that opens to prevent pressure from building up inside the tank. If the valve fails, pressure can build up in the tank, causing it to rupture and leak or even explode. Testing the valve is simple and only takes a few minutes:
- Place a bucket or container under the discharge pipe that’s connected to the pressure release valve.
- Lift the tab on the valve to release water from the tank through the drain pipe attached to the valve.
- Wait for water to flow out of the pipe, then release the tab.
- If no water comes out of the pipe or if water continues to run out after you release the tab, the valve is bad and you’ll need to replace it. “If it sticks, leaks, or doesn’t release water properly, meet with a plumbing service professional to address and correct any issues,” King says.
Related: 9 Best Winter Garage Maintenance Tips for Homeowners
Adjust Water Temperature
Check the thermostat on your water heater periodically to make sure it maintains consistent water temperature at 120 degrees Fahrenheit. “This temperature helps prevent scalding, saves on energy consumption, reduces bacterial growth, and protects internal components,” King says. Setting the temperature higher than 120 degrees Fahrenheit increases burn risk while making your water heater less energy efficient. You can use an instant-read meat thermometer to check the water temperature at the tap.
For a Gas Water Heater
- Gas water heaters have a thermostat dial at the base of the heater that allows you to adjust the temperature. Turn the dial clockwise to increase the temperature and counter clockwise to reduce it.
- Wait a couple of hours for the thermostat change to take effect then check the water temperature at the faucet again.
For an Electric Water Heater
- Cut the power to the water heater at the circuit breaker.
- Use a screwdriver to remove the access panel at the base of the water heater.
- Use a flathead screwdriver to adjust the temperature to 120 degrees Fahrenheit.
- Replace the access panel and flip the circuit breaker on the electrical panel for the water heater on.
- Wait a few hours, then check the water temperature at a faucet.
Related: How Often Should You Change Your HVAC Filter and Which One Is Best for Your Home?
Signs Your Water Heater Needs Maintenance
Regular maintenance can help extend the life of your water heater but eventually you will need to replace it. It’s time to start budgeting for a new one If you begin experiencing any of the issues below:
- Cold water: This is the most obvious issue that homeowners experience. A water heater that produces lukewarm water or inconsistent water temperature is a sign that the heater’s heating element or thermostat is failing.
- Odd noises: If your water heater is making popping or rumbling noises, it’s usually an indication that there is a significant layer of sediment at the bottom of the tank. As the water heats and boils, it creates bubbles that pop as they escape this layer of sediment.
- Leaks: if you notice any amount of rust colored water under the water heater, then it’s likely sprung a leak.
- Corrosion: Look for rust on the outside of the tank. Any corrosion on the tank’s exterior is an indication that there is corrosion on the inside.